Hi there!
Often in my posts I say that I did reverse stamping, or advance stamping. There are many tutorials on line (that is how I learned), but I decided to show what I do, considering that this is something I do often. I just love the idea of using different colors and color in designs, and still have crisp lines.
I did another pictorial, and hope that you will like this.
For start, I do my base color (Revlon - Dreamer), and while that is drying, I start with my decals. You pick design you want to color in, and sky is limit. I prefer floral designs, but I did it on different designs too.
Today, I picked floral design that reminded me of sunflower, and is on Uber Chic 1-02 plate.
1. For stamping of this design I picked Revlon - Espresso, nice brown, as I did not want black. You can always use special stamping polishes, as they are more pigmented and would show better, but I use 'regular' polishes too. Rule of the thumb is - if polish is good to wear in one coat, it is likely that will stamp well. Most metallic polishes are good in that regard.
2. You leave picked up design on the stamper, and I always have more than one of these going on, just in case... Cover design with clear polish, do little bit bigger coverage than necessary because it is easier to get it off of the stamper later. Just a note here. Do not use quick drying top coat, as it dries too quick and I found it to be too brittle, inflexible, hard to work with and prone to breaking. I just bought inexpensive Wet'n wild top coat, but you can use what you have on hand.
For coloring in design, I use dotting tool, but you can use toothpick, or fine brush. First color I did was China Glaze - Sun worshiper, and I filled in just central petals. I decided to leave center of design as is.
3. When that dried, I added my second color Sally Hansen - Lightening, and because my base is little bit darker, I filled in petals over the first coat, so it would be seen better.
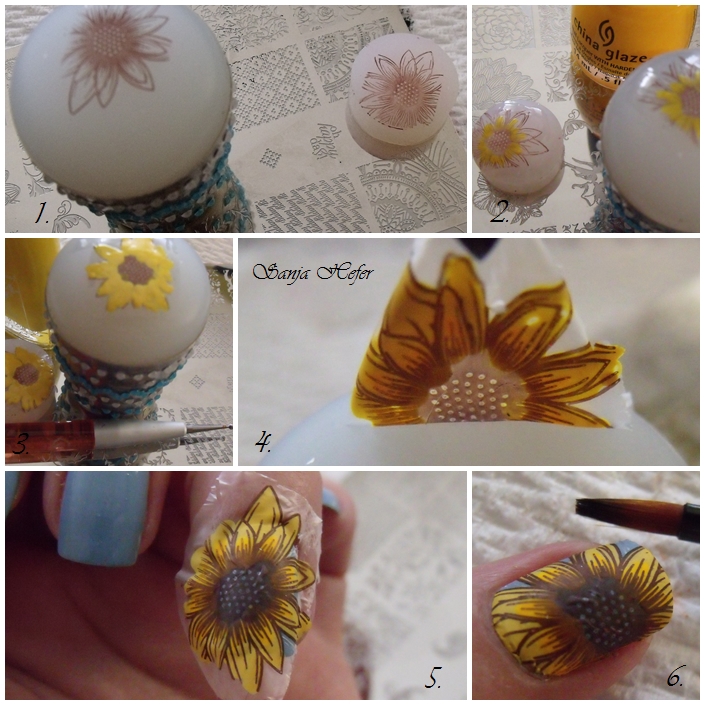
4. I left it to dry and than using a tweezers, I gently peel decal using tweezers. Before peeling it off the stamper I ease it all around, so there would not be any tugging or ripping of the decal.
5. I place it on the nail, and because I did not use quick dry clear coat, I found that even though it is dry on the touch, it would stick to polish right away.
6. Gently press decal, personally I just go from one side to other, clean all the excess design - I use curved scissors to cut as much as I can, and brush and nail polish remover around cuticles.
Seal everything with top coat, and there it is. I hope that all of this made sense to you.