Every now and then, I like to revisit techniques that gave me some trouble in the past... I used two of them in today's manicure, but let me start from the begining.
Couple of days ago, me and my son found ourselfs in a local drugstore, and guess what - they had polish sale! Yeah... you have no idea how much mental strenght took me to walk away with just four new polishes, and four bottles of top coat! In my defense, everything was 75-80% off of the regular price... and we know that it is impossible for me to walk away on the good deal.
and of course I needed to try some of my loot right away.
First one I was itching to use is Sally Hansen - Pink Pong.
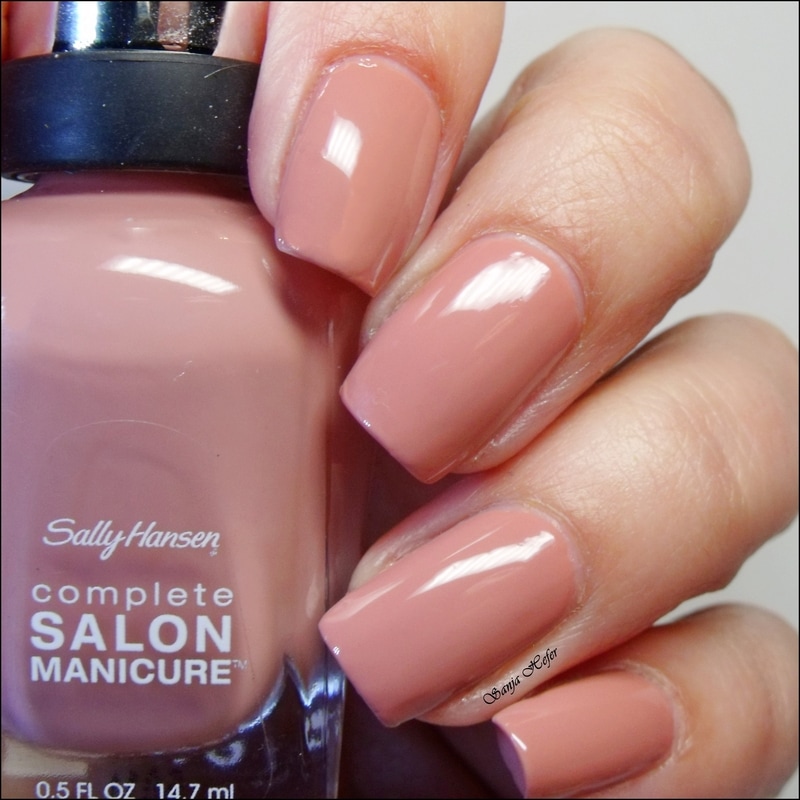
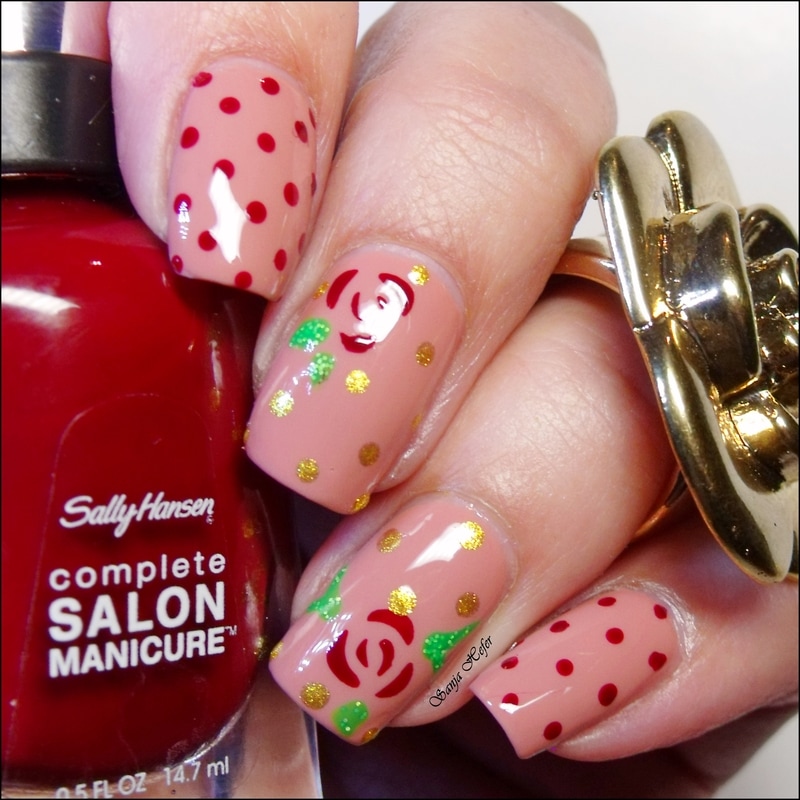
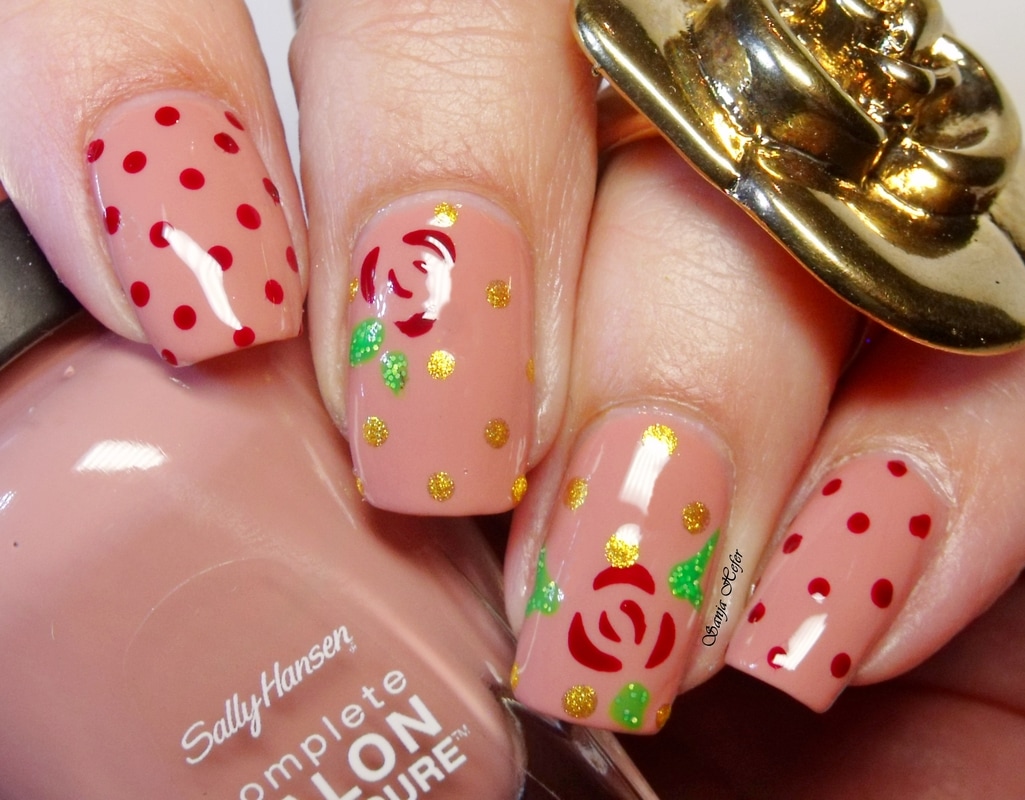
Pink Pong is medium nude polish with some pink undertones that looked good with my skin, or at least that is what I kept telling myself... On the swatch, I am wearing two easy coats, no top coat. This is such a beautiful shade, so office appropriate, not that I have to worry about that, but so lady like and so pretty.
Now let us see what I did over this pretty shade.
I use vinyls next to never... here and there I might do line or two, or some rare use of striping tape, but anything else is so out of my comfort zone...
I have seen so many beautiful manicures using the vinyls, I finaly cave in, and ordered some on line to give them another chance... well, those that I ordered are still in the mail, andI had no other choice but to use what I actually had on hand - super old vinyls that were in a package of striping polishes from Kiss - I think... I probbably have them close to 10 years...
I did try them back in the day, but I never had any luck with them, so I just put them away, and kind of forgot about them. Well, my real problem was that I had no idea how to use them - I would place them over base that was not quite dry yet, and without top coat to keep it in place... I would wait for polish to dry with vinyl on... both resulting in hot mess...
I watched enough tutorials to grasp the concept, so I gave it a try. First of all, your base polish needs to be completely dry, with top coat, that has to be troughly dry. Wait at least 15-30 minutes before you start applying vinyls ( or any other nail guides or striping tape ). This will ensure that your base polish will stay intact when you remove vinyl off of your nail. Second thing is that you can apply polish on the vinyl two different ways - with the brush, or with the sponge. Sponging on the color will ensure that there are no 'Bleeds' under the polish. VInyl needs to be removed ASAP, before polish dries, and you will have nice, crisp lines/edges.
Wait till that is dry, add top coat, and you are good to go.
This elegant color asked for elegant design, so I went with classic roses. For roses, I used another polish I got at the same time - Sally Hansen - Society Ruler, deep burgundy/oxblood that looks awesome with this base color.
Of course, my vinyls did not have any leaves, so I freehand them with a dotting tool and Color Club - Glitter Envy. I needed some brightness in this rather serious manicure.
This was fine, and I did only two nails on each hand, as I did not have any more of the same decals...
To make it more interesting, I added another technique that I avoid like a plaque - dotting.
Yes, I do dot here and there, and like them in random pattern, as it is really hard for me to keep them evenly spaced and same size... but I raised to the challenge, and I did lots of polka dots, using Society Ruler. I know that my dots are not perfect, but I gave it my best.
I also added some gold dots as a background for the roses ( that was an afterthought) using random gold polish.
All was sealed with top coat for a patent shine...
I am pretty happy with final result. It does have vintage vibe, and I do not have anything against it.
I hope you will like it too.
Now let us see what I did over this pretty shade.
I use vinyls next to never... here and there I might do line or two, or some rare use of striping tape, but anything else is so out of my comfort zone...
I have seen so many beautiful manicures using the vinyls, I finaly cave in, and ordered some on line to give them another chance... well, those that I ordered are still in the mail, andI had no other choice but to use what I actually had on hand - super old vinyls that were in a package of striping polishes from Kiss - I think... I probbably have them close to 10 years...
I did try them back in the day, but I never had any luck with them, so I just put them away, and kind of forgot about them. Well, my real problem was that I had no idea how to use them - I would place them over base that was not quite dry yet, and without top coat to keep it in place... I would wait for polish to dry with vinyl on... both resulting in hot mess...
I watched enough tutorials to grasp the concept, so I gave it a try. First of all, your base polish needs to be completely dry, with top coat, that has to be troughly dry. Wait at least 15-30 minutes before you start applying vinyls ( or any other nail guides or striping tape ). This will ensure that your base polish will stay intact when you remove vinyl off of your nail. Second thing is that you can apply polish on the vinyl two different ways - with the brush, or with the sponge. Sponging on the color will ensure that there are no 'Bleeds' under the polish. VInyl needs to be removed ASAP, before polish dries, and you will have nice, crisp lines/edges.
Wait till that is dry, add top coat, and you are good to go.
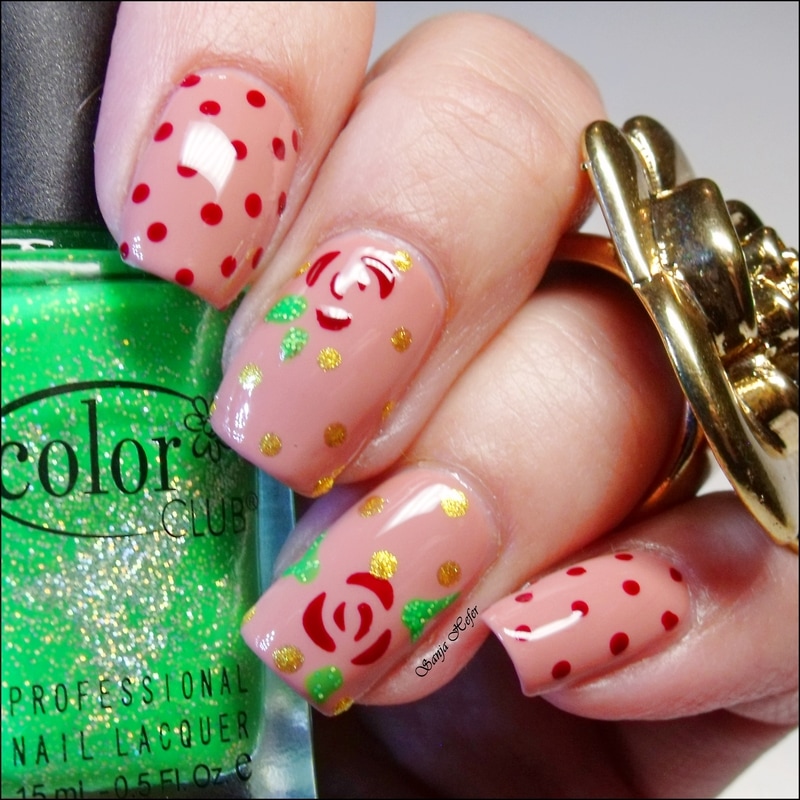
This elegant color asked for elegant design, so I went with classic roses. For roses, I used another polish I got at the same time - Sally Hansen - Society Ruler, deep burgundy/oxblood that looks awesome with this base color.
Of course, my vinyls did not have any leaves, so I freehand them with a dotting tool and Color Club - Glitter Envy. I needed some brightness in this rather serious manicure.
This was fine, and I did only two nails on each hand, as I did not have any more of the same decals...
To make it more interesting, I added another technique that I avoid like a plaque - dotting.
Yes, I do dot here and there, and like them in random pattern, as it is really hard for me to keep them evenly spaced and same size... but I raised to the challenge, and I did lots of polka dots, using Society Ruler. I know that my dots are not perfect, but I gave it my best.
I also added some gold dots as a background for the roses ( that was an afterthought) using random gold polish.
All was sealed with top coat for a patent shine...
I am pretty happy with final result. It does have vintage vibe, and I do not have anything against it.
I hope you will like it too.